Is your green thumb itching for a fiery project, but your living space is more cozy apartment than sprawling garden? Don't let limited square footage extinguish your dreams of harvesting your own homegrown chilies. You absolutelycancultivate a thriving indoor pepper patch, and the rewards – fresh, spicy flavors and vibrant greenery – are well worth the effort.
Growing chilies indoors opens up a world of possibilities, allowing you to enjoy these vibrant plants year-round, regardless of the weather outside. Indoor chili gardening isn't just about convenience; it's about control. You get to manage the environment, protect your plants from pests and diseases, and fine-tune the growing conditions for optimal pepper production. This guide will equip you with the knowledge and techniques to transform even the smallest space into a chili-growing haven.
Choosing the Right Chilies for Your Indoor Garden
The first step to successful apartment chili plants is selecting varieties that thrive in containers and under artificial light. Compact, bushier types are generally better suited for indoor growing than sprawling, vining varieties. Here are a few excellent choices: Thai Chilies: These prolific producers pack a punch and don't require much space. They’re perfect for adding a fiery kick to Asian cuisine. Tabasco Peppers: Known for their use in Tabasco sauce, these peppers are relatively small and easy to manage indoors. Jalapeños: A classic choice, jalapeños are versatile and relatively easy to grow. Look for compact varieties specifically bred for container gardening. Bird's Eye Chilies: These tiny but potent peppers are great for small spaces and offer a significant amount of heat. Ornamental Peppers:While not always the hottest, ornamental peppers like the 'Black Pearl' or 'Purple Flash' add visual interest with their colorful foliage and fruits.
When selecting your seeds or seedlings, consider the pepper's mature size, heat level, and growing requirements. Read descriptions carefully to ensure they are a good fit for your indoor setup.
Setting Up Your Indoor Chili Garden
Before you start planting, you'll need to create the right environment for your chili plants. Here's what you'll need: Containers: Choose pots that are at least 5-7 gallons in size for most chili varieties. Ensure they have drainage holes to prevent waterlogging. Fabric pots are an excellent choice as they allow for better aeration of the roots. Potting Mix: Use a high-quality, well-draining potting mix specifically formulated for containers. Avoid using garden soil, as it can compact and inhibit root growth. A mix containing peat moss, perlite, and vermiculite is ideal. Grow Lights: Adequate light is crucial for indoor chili growing. While a sunny windowsill might work in some cases, it's usually not enough, especially during the winter months. Invest in grow lights specifically designed for plants. LED grow lights are energy-efficient and provide the full spectrum of light that chilies need to thrive. Temperature and Humidity: Chilies prefer temperatures between 70-85°F (21-29°C). Keep them away from drafts and cold windows. Humidity levels should be around 40-60%. If your home is dry, you can increase humidity by using a humidifier, placing a tray of water near the plants, or grouping plants together. Fertilizer:Chilies are heavy feeders and need regular fertilization to produce a good harvest. Use a balanced liquid fertilizer diluted to half strength every 2-3 weeks during the growing season. Look for a fertilizer that is specifically formulated for tomatoes or peppers.
Planting Your Chili Seeds or Seedlings
Whether you're starting from seed or transplanting seedlings, follow these steps for a successful start:Starting from Seed:
- Sow seeds indoors 6-8 weeks before the last expected frost.
- Use a seed-starting mix and sow seeds about ¼ inch deep.
- Keep the soil consistently moist and warm (around 75-80°F or 24-27°C). A heat mat can help speed up germination.
- Once the seedlings emerge, provide them with plenty of light.
- Transplant the seedlings into larger pots once they have a few sets of true leaves.
Transplanting Seedlings
- Gently remove the seedling from its original container.
- Loosen the roots slightly.
- Place the seedling in the center of the new pot and fill with potting mix.
- Water thoroughly.
Caring for Your Indoor Chili Plants: A Daily Routine
Consistent care is essential for healthy and productive indoor chili plants. Here’s a routine to follow: Watering: Water your chili plants when the top inch of soil feels dry to the touch. Avoid overwatering, as this can lead to root rot. Ensure the pot drains well after each watering. Lighting: Provide your plants with 14-16 hours of light per day. If using grow lights, position them about 6-12 inches above the plants. Fertilizing: Fertilize every 2-3 weeks with a balanced liquid fertilizer. Pruning: Prune your chili plants to encourage bushier growth and better airflow. Remove any yellowing or dead leaves. You can also pinch off the tips of the branches to encourage more branching. Pollination: Indoor chili plants often require hand-pollination to set fruit. Use a small paintbrush or cotton swab to transfer pollen from one flower to another. You can also gently shake the plants to help with pollination. Pest Control: Regularly inspect your plants for pests such as aphids, spider mites, and whiteflies. Treat any infestations promptly with insecticidal soap or neem oil.
Troubleshooting Common Indoor Chili Growing Problems
Even with the best care, you might encounter some challenges when growing peppers indoors. Here are some common issues and how to address them: Yellowing Leaves: This can be caused by overwatering, underwatering, nutrient deficiencies, or pests. Adjust your watering schedule, fertilize as needed, and inspect for pests. Blossom Drop: This is when the flowers fall off the plant without producing fruit. It can be caused by temperature fluctuations, lack of pollination, or stress. Ensure consistent temperatures, hand-pollinate if necessary, and provide adequate light and water. Stunted Growth: This can be caused by insufficient light, poor soil, or pests. Ensure your plants are getting enough light, use a high-quality potting mix, and inspect for pests. Pests: Aphids, spider mites, and whiteflies are common indoor pests. Treat them with insecticidal soap, neem oil, or other appropriate insecticides.
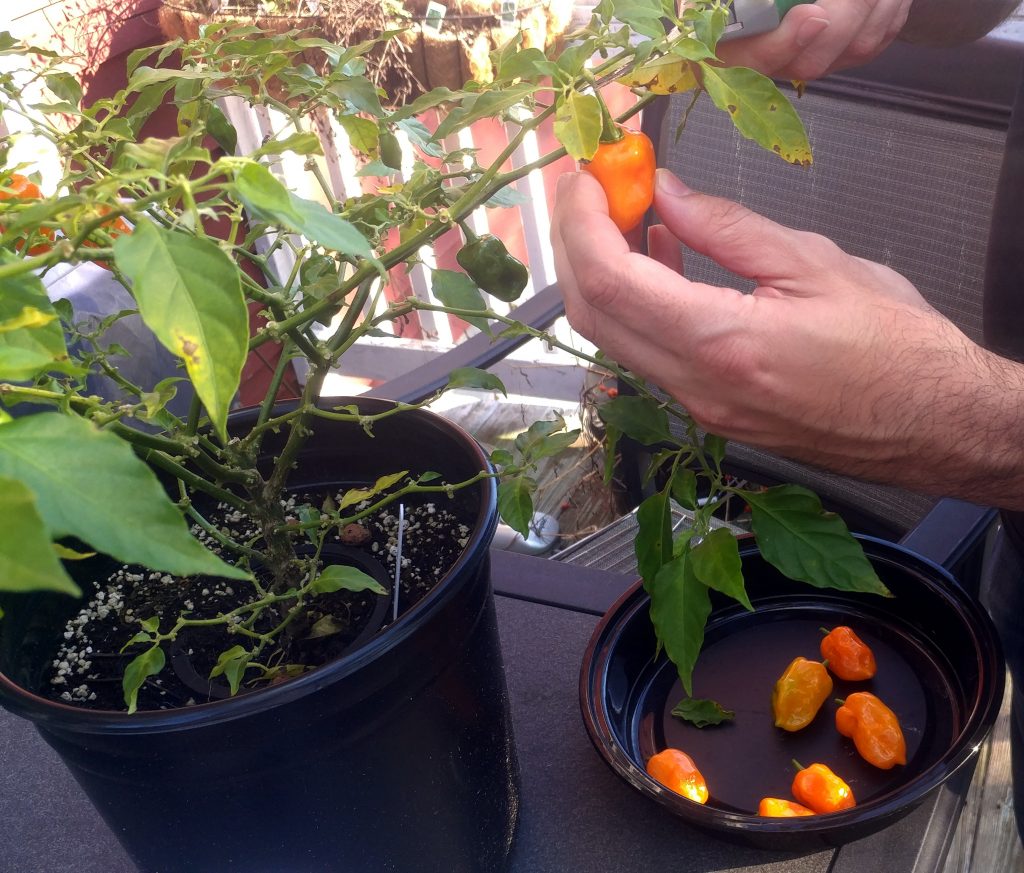
Harvesting and Enjoying Your Homegrown Chilies
The moment you’ve been waiting for: harvesting your chilies!
Chili peppers are typically ready to harvest when they have reached their mature color and size.
Use pruning shears or scissors to cut the peppers from the plant, leaving a small stem attached.
Store your harvested chilies in a cool, dry place. You can also freeze them, dry them, or pickle them for longer-term storage.
Now, get creative and enjoy the fruits (or peppers!) of your labor. Use them in your favorite recipes, make your own hot sauce, or share them with friends and family.
Exploring Advanced Techniques for Indoor Chili Growing
Want to take your indoor chili growing to the next level? Consider these advanced techniques: Hydroponics: Grow your chilies in a nutrient-rich water solution without soil. Hydroponic systems can be very efficient and productive. Aquaponics: Combine hydroponics with aquaculture, raising fish and using their waste to fertilize your chili plants. Air Pruning: Use special containers that allow the roots to be air-pruned, promoting stronger root growth. Grafting: Graft different chili varieties onto a single rootstock to create unique and productive plants.
FAQs: Your Indoor Chili Growing Questions Answered
Q: How much light do my indoor chili plants need?
A: Indoor chili plants require a minimum of 14-16 hours of light per day. Natural sunlight from a south-facing window can work, but supplemental grow lights are usually necessary to ensure optimal growth and fruit production. LED grow lights are a popular and energy-efficient option.
Q: How often should I water my indoor chili plants?
A: Water your chili plants when the top inch of soil feels dry to the touch. Avoid overwatering, as this can lead to root rot. Ensure the pot drains well after each watering. The frequency will depend on factors such as the size of the pot, the type of potting mix, and the ambient temperature and humidity.
Q: What kind of fertilizer should I use for my indoor chili plants?
A: Use a balanced liquid fertilizer diluted to half strength every 2-3 weeks during the growing season. Look for a fertilizer that is specifically formulated for tomatoes or peppers, as these will provide the nutrients that chili plants need to thrive. A fertilizer with an N-P-K ratio of 5-10-5 or similar is a good choice.
Q: How can I hand-pollinate my indoor chili plants?
A: Use a small paintbrush or cotton swab to gently transfer pollen from the stamen (male part) of one flower to the pistil (female part) of another flower. You can also gently shake the plants to help with pollination. Hand-pollination is often necessary for indoor chili plants, as there may not be enough natural pollinators present.
Don't let a small space limit your gardening ambitions. Growing peppers indoors is a rewarding and accessible hobby for anyone, anywhere. With the right knowledge, a little bit of care, and a dash of patience, you can enjoy a bountiful harvest of homegrown chilies right in your own home. So, embrace the challenge, get your hands dirty, and prepare to spice up your life with the vibrant flavors of your very own indoor chili garden!

Post a Comment