Is your indoor chili plant looking a little lackluster? Maybe the leaves are yellowing, or the pepper production just isn't what you hoped for. The truth is, growing peppers indoors, while rewarding, requires a keen understanding of their nutritional needs. Getting this right is the key to bountiful harvests and vibrant plants.
Growing chilies indoors is a fantastic way to enjoy fresh, spicy peppers year-round, regardless of your climate or outdoor space. But these plants are entirely reliant on you to provide everything they need, from light and water to the essential nutrients that fuel their growth. Unlike outdoor plants that can access nutrients from the soil, indoor chili plants in containers depend on you to deliver the goods. This guide will break down exactly what your apartment chili plants need to thrive, ensuring you’re equipped to cultivate healthy, productive plants.
Understanding the Basics of Indoor Chili Nutrition
Just like us, chili plants need a balanced diet to flourish. The primary nutrients are nitrogen (N), phosphorus (P), and potassium (K), often represented as N-P-K on fertilizer labels. Each plays a crucial role: Nitrogen (N): Promotes leafy green growth. Essential for healthy foliage development. Phosphorus (P): Supports strong root development and flowering. Crucial for pepper production. Potassium (K):Enhances overall plant health, disease resistance, and fruit quality. Improves the vibrancy and flavor of your chilies.
Beyond these macronutrients, chili plants also need micronutrients like calcium, magnesium, iron, manganese, zinc, copper, boron, and molybdenum. While needed in smaller amounts, these are equally vital for various plant functions. A deficiency in any of these can lead to stunted growth or other problems.
Choosing the Right Soil for Container Gardening Chilies
The foundation of successful indoor chili gardening starts with the right soil. Avoid using garden soil, as it's often too dense and doesn't drain well in containers. This can lead to root rot and other issues. Instead, opt for a well-draining potting mix specifically formulated for container gardening.
A good mix typically contains: Peat moss or coco coir: Provides moisture retention and aeration. Perlite or vermiculite: Improves drainage and aeration. Compost:Adds essential nutrients and beneficial microbes.
You can also create your own custom mix. A recommended blend is equal parts peat moss (or coco coir), perlite, and compost. Consider adding a slow-release fertilizer to the mix at planting to provide a steady supply of nutrients.
Fertilizing Your Indoor Chili Plants: A Step-by-Step Guide
Once your chili plants are established, you'll need to start a regular fertilizing routine. Here's a step-by-step guide:
1.Start with a Balanced Fertilizer: Begin with a balanced liquid fertilizer (e.g., 10-10-10 or 20-20-20) diluted to half strength. Apply this every two weeks during the growing season (spring and summer).
2.Switch to a Bloom Booster: Once your plants start to flower, switch to a fertilizer with a higher phosphorus content (e.g., 10-30-20). This will encourage abundant flowering and pepper production.
3.Consider Calcium and Magnesium: Chili plants are prone to calcium and magnesium deficiencies, which can lead to blossom end rot (a dark, sunken spot on the bottom of the pepper). Supplement with calcium magnesium fertilizer (Cal-Mag) every few weeks.
4.Foliar Feeding (Optional): You can also supplement with foliar feeding, spraying diluted fertilizer directly onto the leaves. This allows the plant to absorb nutrients quickly. Do this in the early morning or late evening to avoid leaf burn.
5.Monitor Your Plants: Keep a close eye on your plants for any signs of nutrient deficiencies (more on this below). Adjust your fertilizing routine accordingly.
Pro Tip: Always water your plantsbeforefertilizing to avoid burning the roots.
Recognizing and Correcting Nutrient Deficiencies in Indoor Chili Growing
Even with a regular fertilizing routine, nutrient deficiencies can still occur. Here are some common signs and how to address them: Nitrogen Deficiency: Yellowing of older leaves, stunted growth. Solution: Apply a nitrogen-rich fertilizer or compost tea. Phosphorus Deficiency: Dark green leaves, purplish stems, poor flowering. Solution: Apply a phosphorus-rich fertilizer or bone meal. Potassium Deficiency: Yellowing or browning of leaf edges, weak stems. Solution: Apply a potassium-rich fertilizer or wood ash tea. Calcium Deficiency: Blossom end rot, distorted new growth. Solution: Apply a calcium supplement or Cal-Mag. Ensure consistent watering. Magnesium Deficiency: Yellowing between leaf veins, starting with older leaves. Solution: Apply Epsom salts (magnesium sulfate) diluted in water. Iron Deficiency: Yellowing between leaf veins, starting with younger leaves. Solution: Apply an iron chelate supplement.
When diagnosing nutrient deficiencies, start by checking the p H of your soil. If the p H is too high or too low, the plant may not be able to absorb nutrients properly, even if they are present in the soil. Aim for a p H between 6.0 and
7.0.
Lighting, Watering, and Pollination: The Complete Indoor Chili Care Routine
Beyond nutrition, other factors play a crucial role in the success of your indoor chili plants: Lighting: Chili plants need at least 6-8 hours of direct sunlight per day. If you don't have enough natural light, supplement with grow lights. LED grow lights are energy-efficient and effective. Watering: Water deeply when the top inch of soil feels dry to the touch. Avoid overwatering, which can lead to root rot. Ensure your containers have good drainage. Pollination: Indoor chili plants often need help with pollination, as there are no bees or other insects to do the job. You can hand-pollinate by gently shaking the plant or using a small paintbrush to transfer pollen from one flower to another. Temperature: Chili plants prefer temperatures between 70-85°F (21-29°C). Avoid exposing them to drafts or extreme temperature fluctuations. Humidity:While not critical, chili plants appreciate moderate humidity (40-60%). You can increase humidity by placing a tray of water near the plants or using a humidifier.
Hydroponic Chili Growing: An Alternative Approach
For the adventurous gardener, hydroponic chili growing offers an alternative to traditional soil-based methods. Hydroponics involves growing plants in water enriched with nutrients, without any soil. This method can lead to faster growth and higher yields.
There are various hydroponic systems, including: Deep Water Culture (DWC): Plants are suspended in a nutrient solution. Nutrient Film Technique (NFT): A shallow stream of nutrient solution flows over the roots. Drip Systems:Nutrient solution is dripped onto the roots.
Hydroponic chili growing requires a specialized nutrient solution formulated for peppers. Regular monitoring of p H and nutrient levels is essential.
Troubleshooting Common Indoor Chili Plant Problems
Even with the best care, problems can arise. Here are some common issues and how to address them: Aphids: Small, sap-sucking insects that can weaken plants. Solution: Spray with insecticidal soap or neem oil. Spider Mites: Tiny pests that create webs on leaves. Solution: Increase humidity and spray with miticide. Whiteflies: Small, white insects that fly up when disturbed. Solution: Use yellow sticky traps and spray with insecticidal soap. Fungal Diseases: Can cause leaf spots or root rot. Solution: Improve air circulation, avoid overwatering, and apply a fungicide.
Regularly inspect your plants for any signs of pests or diseases. Early detection and treatment are crucial.
Growing Peppers Indoors: Common Questions Answered
Here are some frequently asked questions about growing chilies indoors:
What kind of grow lights are best for peppers?
LED grow lights are generally considered the best option for indoor chili plants due to their energy efficiency, long lifespan, and ability to provide the full spectrum of light needed for healthy growth.
How often should I water my indoor chili plant?
Water your indoor chili plant when the top inch of soil feels dry to the touch. The frequency of watering will depend on factors like temperature, humidity, and pot size.
How do I hand-pollinate my indoor chili plant?
Use a small, soft paintbrush to gently collect pollen from the stamen of one flower and transfer it to the pistil of another flower. You can also gently shake the plant to help distribute pollen.
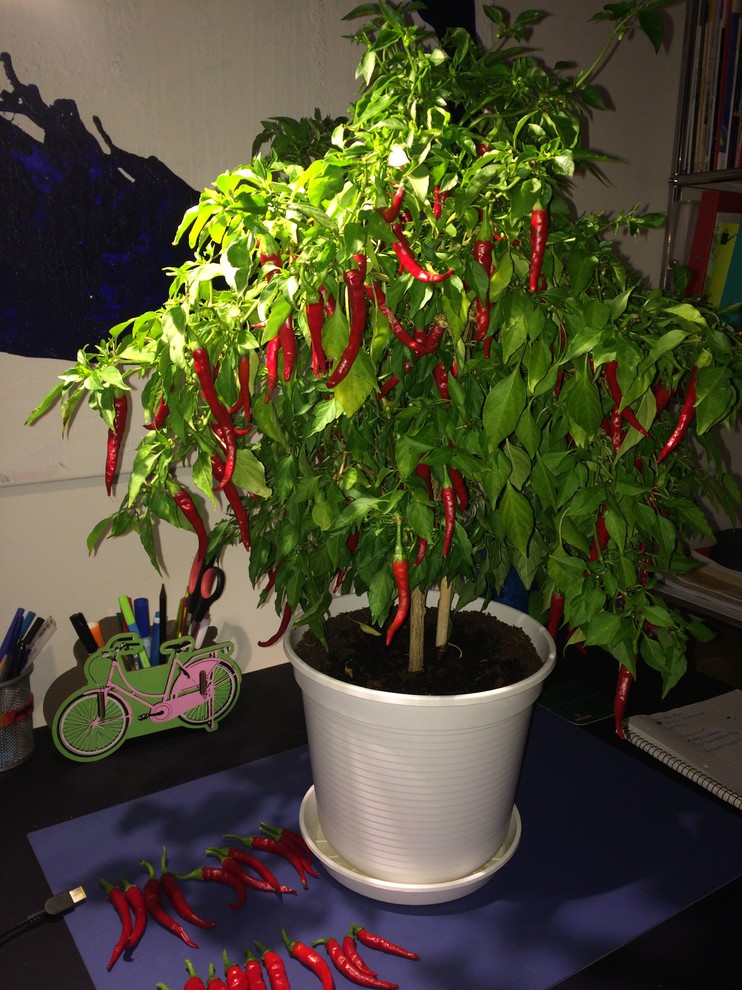
Harvesting and Enjoying Your Homegrown Chilies
The most rewarding part of growing chilies indoors is harvesting your own fresh peppers. The time it takes for peppers to mature varies depending on the variety. Once the peppers have reached their mature color and size, they are ready to harvest.
Use sharp scissors or pruning shears to cut the peppers from the plant, leaving a small stem attached. Enjoy your homegrown chilies fresh, or preserve them by drying, pickling, or freezing.
Growing chilies indoors is a fulfilling experience that brings spice and flavor to your life, all year round. By understanding their nutritional needs and providing the right care, you can cultivate healthy, productive plants that reward you with an abundant harvest of delicious peppers. So, grab your pots, soil, and seeds, and get ready to embark on your indoor chili growing adventure!

Post a Comment